|
Microsoft Word is the standard software used for editing, and Track Changes is one of its most useful features: it shows amendments that have been made to a Word document and allows other people to accept or reject these changes. When I’m editing for a client – whether that’s an academic author, a government body, a business, an organisation, or an individual – my focus is on making it easy for them to see the amendments I have made to their material. Track Changes is the ideal way to do that. I can also add queries or explanations using the Comments function.
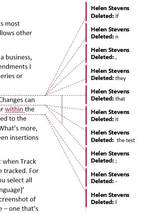
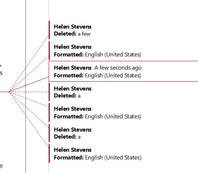 Track Changes: Language changes Track Changes: Language changes There are a few things an editor can do to make it easier for a client to read a document when Track Changes have been used. First, it’s worth considering whether every change needs to be tracked. For example, will the author need to know that you’ve changed the proofing language? If you select all the text and change the language with Track Changes on, this will add a ‘Formatted: [language]’ mark-up every time you make any sort of correction to the text from then on (see left). So you may decide to make this a ‘silent’ change – one that’s made with Track Changes turned off. Another correction that can usually be left untracked is changing double spaces (between words or sentences) to single spaces. The same goes for any unnecessary spaces that occur at the end of a line or paragraph, or within the cells of a table. Changes to the overall formatting – the font size, the line spacing, the paragraph style – are often best left untracked. If it’s important for the author to know that you’ve made any of these untracked changes, you can add a Comment at the start of the document or mention it in the covering email when you return the work. When it comes to sending the edited document back to the client, there are various steps you can take to help with readability and clarity. I usually send two versions of the document:
 Track Changes: Final view If the client wants to look at all my amendments – apart from the ones I’ve made ‘silently’ – the Tracked document gives them the full picture. The client can go through the document line by line and accept or reject each change at the touch of a button. The points raised in the Comments can also be considered along the way. Alternatively, if the client prefers to read the end result and is not overly concerned with each amendment, the Final version is available. The document can be read without the distraction of coloured lines and corrections, and the Comments are still visible, so any queries or explanations are there for the client to see. Rather than peruse the Final version, the client could, of course, simply use the Tracked version and choose to view the document with ‘No Markup’ (one of the viewing options on the Tracking section of the Review tab). This would look the same as the Final version and would enable the client to quickly view, accept or reject the corrections by toggling from ‘No Markup’ to ‘Full Markup’. 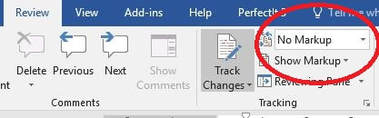 Track Changes: Adjusting the view But I’ve found that clients appreciate having the two different versions – one with changes showing and one with changes accepted – with the Comments visible on both. Track Changes is a useful feature, but there are so many options for how the mark-up appears (and which types of correction are visible) that it pays to keep things straightforward. 
0 Comments
Love it or hate it, Microsoft Word is difficult to avoid if you’re an editor, proofreader or writer. So it’s worth getting to grips with Word and familiarising yourself with its many features. This can save you time (which often means ‘save you money’), improve your accuracy, and – particularly when it comes to dealing with repetitive tasks and corrections – leave you free to focus on things that can’t be automated. Even if you’ve been using Word for a while, you may not be familiar with all the tools I’ll mention. Don’t worry: you can still do a good job without them, but it’s worth exploring how each of them could help you. Each tool has its pros and cons, so do take the time to practise and get to know which tool works best for which task. Then, the next time you have a suitable job to do, you can dive straight in and put these tools to work! 1. Find & ReplaceThis is useful when you want to replace one item – whether that’s a single character, a group of characters, a word, a phrase, or most other things – with another. You can refine your search using the ‘More’ button in the Find & Replace box. This will give you various options, such as ‘Match case’ and ‘Whole words only’, and various other choices under ‘Format’ and ‘Special’. 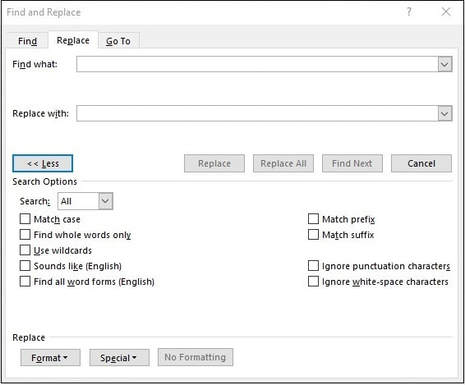 PROS Find & Replace is fairly straightforward and intuitive. It allows you to click through and change items one by one, or ‘Replace all’ if you are sure you need to correct all instances in the document. CONS Beware of unintended consequences, particularly when using ‘Replace all’. The results can be amusing (e.g. changing ‘pants’ to ‘trousers’ results in ‘particitrousers’), but remember that mistakes take time to fix. EXAMPLES Changing one spelling to another (e.g. ‘favor’ to ‘favour’) Removing unwanted spaces (e.g. change two spaces to one space after a full stop) Italicise all instances of a word (using ‘Format’) FIND OUT MORE MS Office support, or Word’s in-built ‘Help’ function 2. WildcardsThis feature of Find & Replace allows you to search for a pattern of characters (rather than a particular character, word or phrase) and make specific changes to it. For example, if you wanted to remove the full stop after Dr., Mr. and Mrs., you could use wildcards to find and replace each of these salutations with one that doesn’t include a full stop – something that wouldn’t be possible with a single Find & Replace action. You need to choose the ‘Use wildcards’ option in the Find & Replace box and then use sets of symbols to define what you’re looking for. For example, [A-Z] will find any upper case letter, while b?t will find bat, bet, bit, bot and but – and, in fact, b5t, since the ‘?’ represents any character. 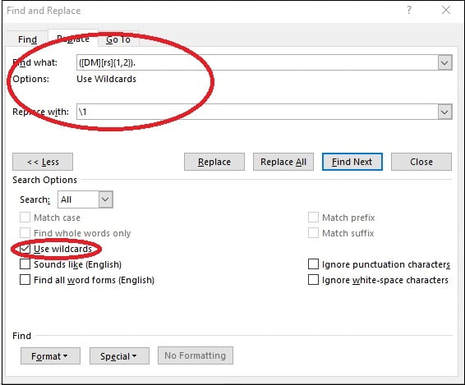 PROS Wildcards are a very powerful tool. They are useful because they allow you to find patterns rather than exact strings of characters (as you do with the basic ‘Find & Replace’). CONS They can seem rather baffling at first glance! It takes time to develop the skill of defining terms correctly, so be prepared to practise. As with a normal Find & Replace, there can be unintended consequences. EXAMPLES Transposing names, dates, etc. Inserting spaces between numbers and symbols Formatting references FIND OUT MORE PC World article WordMVP article Jack Lyon’s Wildcard Cookbook (free to download from the Intelligent Editing website) 3. PerfectItThis is an add-in for Word that you can purchase from Intelligent Editing. It’s a consistency checker that analyses your whole document, finds inconsistencies, and lists them so that you can choose whether or not to change each one. PerfectIt has a host of other features, including the facility to use wildcards as part of your tests. It has different style sheets that are available to users, and you can customise the tests to check for specific style issues. You can also share your own style sheets with other users.  –PROS PerfectIt is easy to install and use, and it is immensely useful, even if you don’t take advantage of all its customisability. You’re always in control, as you decide which corrections to make and which to ignore. PerfectIt can be useful for analysing a document before you begin editing and for checking that you haven’t missed anything once you’ve finished. It’s customisable to your own or your client’s requirements. CONS You have to pay for it! It's available on an annual subscription, and there are hefty discounts for members of various organisations, including the Society for Editors and Proofreaders (SfEP). A previous drawback – that PerfectIt was only available for PC – has recently been partially rectified with the introduction of a cloud version, which can be used on a Mac. EXAMPLES Hyphenation Variant spellings (ise/ize) Capitalisation List punctuation Heading styles Number styles Abbreviations (are they all defined?) FIND OUT MORE Intelligent Editing website 4. MacrosA macro is a series of commands that you run together to save time on repetitive tasks. Each macro performs a different function, or series of functions, and you install each one separately so that you have a menu to choose from. You can also assign keyboard shortcuts to each macro, which speeds things up even more. Anyone can write their own macros, but there are plenty of ready-made ones available. UK editor Paul Beverley has produced a whole book of them, including instructions on how to install and use them, and this is free to download. He also has a useful YouTube channel. 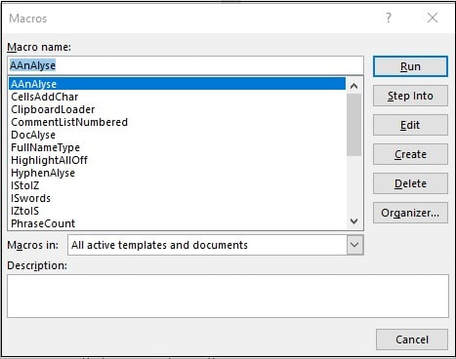 PROS Macros are powerful tools that can save literally hours of time on repetitive tasks. They’re free to write, install and use. Even ready-made macros can be customised, once you’re familiar with how they’re put together. CONS They may seem daunting at first, but once you’ve installed your first macro, the world is your oyster! Beware of unintended consequences (see above). EXAMPLES A couple of Paul Beverley’s ‘big’ macros:
FIND OUT MORE Paul Beverley’s website Paul’s YouTube channel There are plenty of online resources to help you with these and other features of Microsoft Word. The Society for Editors and Proofreaders (SfEP) has an excellent course – Editing with Word – that covers these and many other aspects of the software. Do spend some time getting to grips with these tools and exploring what Word can do. They can help you to achieve greater accuracy, consistency and speed in your editing and writing. What’s not to like?  |